
40+ Hack: Silver and Gray Hair Requires a Strong Brow Game
- Kristin Buchholz-MacKillop

- Feb 17, 2020
- 5 min read
Updated: Dec 31, 2022

Greetings fashionistas! During the ongoing process of migrating nearly a decade's worth of posts to this, the new platform, it dawned on me that I have not done a hair post in what appears to be quite literally years. The posts I originally did back in 2012 (ish) about my journey of ditching the dye and making the transition to my natural gray hair are, to this day, some of my most popular posts, so I suppose I've been a bit negligent in the area of aftercare for those of you who may have been looking for a follow-up after all this time.
I'm guessing that like me, those if you who have been living with your natural hair for a while now have long since ditched any insecurities about it. I know I certainly have. But that's not to say that I haven't had to rethink quite a lot of my overall style game in the wake of the transition. It's always been my belief that when you have long (too long as of right now), naturally unruly salt and pepper hair at middle age, the rest of your style game has to have a bit of bite to it as to not accidentally mimic that most tired of middle aged woman archetypes, The Crazy Cat Lady. Mind you, it's completely acceptable to actually be a Crazy Cat Lady, it's apparently looking like one that has become some sort of emblem of a portion of society's desire to erase middle aged women from the sartorial paradigm. But I digress. Some of us wouldn´t go quietly anyway, as you could probably guess.
Defining Your Brows at 40+
Let's talk about what I think is the most important part of cultivating a finished, eye-catching, and at times dramatic look on the backdrop of natural gray and silver hair, middle agedness, or really wherever you happen to be on your journey. The secret ingredient?
A strong eyebrow game.


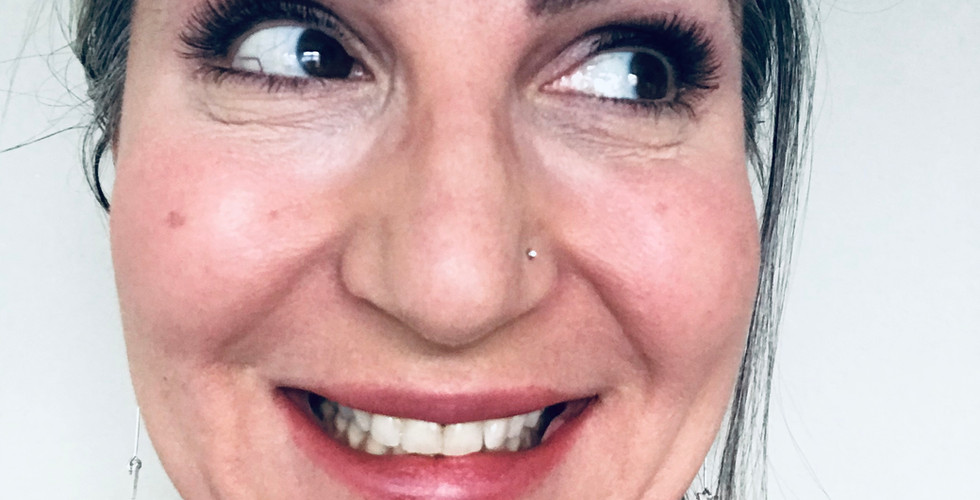


A well-proportioned, gently-defined brow has the power to completely elevate your look. This is even more important as we age. Thinner skin, graying hair, perhaps a bit of (dare I day it) sagging (gasp) of the facial structures all work to erase the definition we had in our youth. While it would be ill-advised to reach for the products we did in our 20s, we can still work with what we've got, in the context of where we are now.
Those of you who have been with me for a while may remember a previous post I did about eyebrow pencils for gray hair. I still stand by the products that I recommended in that post. However, personally I have moved on to a different product, which I'm wearing in these photos. In fact, it is the only product I have on my brows in these photos. No pencil, no wax, no clear gel to "set" anything. This is what I'm into right now. And no, I hasten to add I'm not being paid for this post.

So first of all, don't get this confused with the Anastasia Tinted Brow Gel, which is a different product. This product, the Dipbrow Gel, is in the same line of products as their much-lauded Dipbrow Pomade, which I have also tried. Personally, I didn't have much luck with the pomade; I simply did not have a skilled enough hand to work with the little brush and waterproof formula to get a realistic hairstroke painted on my face before it dried down, and I always ended up looking a bit "painted-on."
With that experience logged-away in my mental browsing history, I was a bit nervous trying the gel formula from the same line, but after giving it a go in Sephora in Tampa , I was hooked. It's essentially the same formula made into what is basically a mascara for the brows. But unlike mascara, you can also use this formula to do some shading. It's a lot easier than the original pomade formula, but some practice is still required to find the right amount of product and pressure of application to get the look you're after. The shade I use is Ash Brown, which I believe is the third from the left in the pic above. It's a really great cool option for a dark brunette without being inky black, or reddish when the light hits it. The following are a few tricks that I've come to learn about this product, which I love more and more with each application.

Scrape off the excess product from the brush, as you would with a new tube of mascara. This will prevent accidental little blobs of color depositing more product than you may want onto your brows.
Start with a very light hand. Don't press the wand into the base of your brows, as you do with mascara at the base of your lashes. Instead, just gently flit the wand in the direction of the hair.
If you do make a boo-boo, you can correct it with a Q-tip dipped in makeup remover. The sooner the better, this formula doesn't budge once it dries.
Pursuant to said waterproof formula, if you like a "feathered" appearance to your brow hairs like I do, make sure you work light and quick - it dries pretty fast.
If you are someone who needs to fill-in your brows, the best way to do it with this product is to apply a light layer, let it dry for a minute, then use a brush to gently nudge the color into the space you want to fill.
Most importantly, don't overwork it! Use a light hand - a little goes a long way!

My favorite tool to use with this product is actually the brush I got when I tried the original pomade formula - the Anastasia Brush 12 Dual Ended Firm Angle Brush. Once the product has dried-down, I use the mascara end to comb-out any remaining blobs and spread the color out a bit. If you need more filling-power the angled end of the brush would work perfectly (being a rather thick-browed human, I don't do this.)
Once you find your stride with this product, you can create looks ranging from natural to Ka-Pow! Today I did what I consider to be my standard application, which incidentally, also passes the nautral light test with flying colors.
Now to do something about that frizzy hair. I should have paused for a handful of serum after I took the clip out. I clearly hadn't thought this through.


This post has been shared with: Not Dressed as Lamb, Jersey Girl, Texan Heart, Living on Cloud Nine, A Labour of Fashion, Curly Crafty Mom, Doused in Pink
Find it Here!


Thank you for sharing such a helpful information . I am a makeup artist . Keep sharing information!
Him
https://www.beyoung.in/
I've been paying more attention to my brows as I get older and need to check out this product. Your brows look great! And, your hair is gorgeous!
Jill - Doused in Pink
I have been getting more and more gray hair and it frustrates me, but it could be a lot worse! Ha! I have been thinking about moving my hair appts up to every 6 weeks instead of 8, but not sure if I want to do that. I LOVE your hair, it looks so lovely in that last photo and your brows look great, too! I love a good brow!
Carrie
curlycraftymom.com
I haven't started getting gray hairs yet; though I am over 40 and realize they could show up at any time. I've already decided I don't want to go the hair dye route and this is a pretty helpful tip; thanks.